jQuery selectors for CodedUI

I have created a nuget package that helps you select elements from a page using jquery selectors. Its called CodedUI.jQueryExtensions.

It currently adds 4 methods to the BrowserWindow object.

IEnumerable JQuerySelect(this BrowserWindow window, string selector)

bool JQueryExists(this BrowserWindow window, string selector)

bool JQueryWaitForExists(this BrowserWindow window, string selector)

bool JQueryWaitForExists(this BrowserWindow window, string selector, int timeoutMilliSec)

Selecting li’s from a ul with and id is as simple as this:

Browser.JQuerySelect<HtmlControl>("#multipleElementsTest li");

If the selector did not return any results then an empty enumerable will be returned.

Checking to see if an element exists is now trivial:

return Browser.JQueryExists("#div1");

Waiting for an element to exits (perhaps a dialog to open?):

return Browser.JQueryWaitForExists("#modalDialog");

But what if I don’t have jQuery on the page I am testing

CodedUI.jQueryExtensions will automatically include a reference to jQuery on the page if one does not already exist. When the package is installed it adds a appSetting to the app.config file that contains the URL of the jQuery that will be referenced. By default it uses ‘//code.jquery.com/jquery-latest.min.js’

How do i install it?

PM> Install-Package CodedUI.jQueryExtensions

Check out the project page
https://github.com/rpearsondev/CodedUI.jQueryExtensions

Check out the nuget page
https://www.nuget.org/packages/CodedUI.jQueryExtensions/”

StubBuilder – Automatically Inject stubs into constructor for complex object using the builder pattern

The Builder Pattern is used to construct a complex object. It can looks something like this:

var thingProvider = MockRepository.GenerateStub<IThingProvider>();

thingProvider.Stub(x => ...)

IOrderService orderService = (new OrderServiceBuilder())
    .WithThingProvider(thingProvider)
    .Build();

This is a simple example where I want to create an IOrderService with all default (stubbed) dependencies except I want to override the ThingProvider (one of its dependencies) with a stub that I have supplied.

However I have had go and make a OrderServiceBuilder and add a method for each of its dependencies. This is too much effort.

I commonly create builders in my unit tests because it saves me having to supply mocks to the OrderServices constructor for each test. I only override the dependencies that I need to fulfill the test I am writing thereby making my test code DRY.

To make my life easier and my code even more DRY I decided to create a generic builder that will automatically inject stubs for all the dependencies but allow me to replace them if I want to.

The constructor for the (simplified) type under test looks like:

public OrderService(IThingProvider thingProv, ISomeOtherProvider someOtherProv)
 {
 _thingProv = thingProv;
 _someOtherProv = someOtherProv;
 }

You should only need to replace the dependencies that you require to complete the test that you are conducting:

IThingProvider mockThingProvider = new ConcreteThingProvider();

IOrderService orderService = (new StubBuilder<IOrderService, OrderService>())
 .With(mockThingProvider)
 .Build();

This is the solution that I came to. It uses a internal UnityContainer to resolve the type under test. The stub builder will register all of the types in the constructor with mock instances. I use Rhino Mocks to make the stubs.

public class StubBuilder<TInterface, TImplementation> where TImplementation : TInterface
{
    protected readonly IUnityContainer Container;

    public StubBuilder()
    {
        Container = new UnityContainer();

        var typeOfImplementation = typeof(TImplementation);
        var constructor = typeOfImplementation.GetConstructors().First();

        foreach (var parameter in constructor.GetParameters())
        {
            Container.RegisterInstance(parameter.ParameterType, MockRepository.GenerateStub(parameter.ParameterType));
        }

        Container.RegisterType(typeof(TInterface), typeof(TImplementation));
    }

    public TInterface Build()
    {
        return Container.Resolve<TInterface>();
    }

    public StubBuilder<TInterface, TImplementation> With<TDependency>(TDependency dependency)
    {
        Container.RegisterInstance(typeof(TDependency), dependency);
        return this;
    }
}

The With method will overwrite the currently registered ‘stub’ instance with an instance of the callers choice.

I will never (or at least not as often) have to create another builder that injects stubs again.

This StubBuilder will cater for most of the times I need to create a builder, however it does have its limitations. Currently it only supports a single constructor and if the object under test has dependencies that cannot be stubbed I will have to revert back to the old method. I am however happy with it for now.

Writing a 2d Game using Canvas

The vision

C1 Droid shooting at hero

C1 Droid shooting at hero

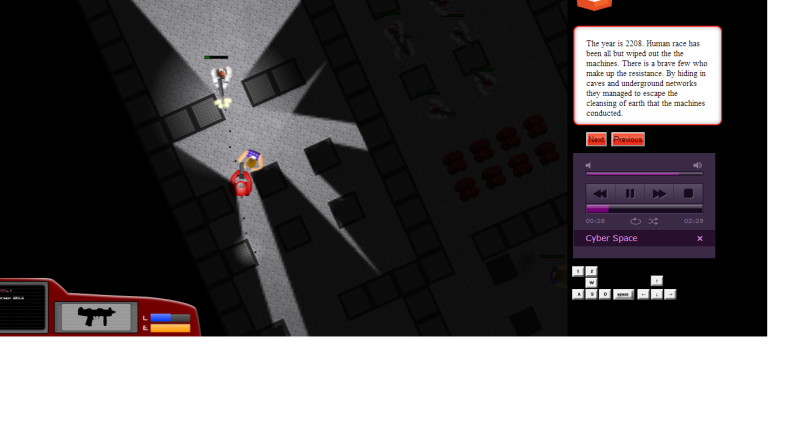
A 2d shooter similar to the classic DOS game Cyberdogs that I used to play with a friend. It should have robot controlled zombies and smart bad guys that will run away if they are already hurt. It should have the ability to create multiple levels and the levels should be created using a map maker.

Check out the game here

Writing the core engine

Organizing the game code

JavaScript can be chaotic at the best of time, and with writing something as complex as a game it can quickly become complicated and messy. To counter the problem one must try and think about the objects, modules, level structure upfront.

I have chosen to use pseudo classic JavaScript inheritance. This basically means that the prototype of a derived object points to an instance of the base object. In addition to that the base object’s constructor is called using the apply method with the derived object sent in as the context. This means that the base objects constructor gets run against the derived object.

Creating graphics

I am using Fireworks CS5 to create all of the sprites. The whole image is exported as a single png file and each type (game object) within the game knows where its image is withing the main “sprites.png” image.

Game Types

rp.GameObject

Base for all game objects. Contains methods/properties that many of the derived objects will use.

rp.GameObject = function () {
	rp.BaseObject.apply(this, arguments);
	this._name = "GameObject";
	this._X = 0; 
	this._Y = 0;
	this._directionRadians = rp.Math.RadiansPerCircle();
	this._turnRate = 0.0003;
	this._directionDepth = 0;
	this._speedX = 0;  //which way am i moving
	this._speedY = 0;
	this._collisionRadius = 10;//how wide am I across
	this._collisionCircle = true;	//circle or a square	
	this._collisionOffsetX =0;
	this._collisionOffsetY =0;
	this._maxX = 0;
	this._maxY = 0;
	this._shouldBeRemoved = false;
	this._decorators = 0;
	this._LOSDistance = 500;
};
rp.GameObject.prototype = rp.TypeHelper.Extend(new rp.BaseObject, {
        //To be overridden in derived objects
	Init:function(){...},
	Update: function (timeSinceLastLoop, levelTime) { }, 
	Draw: function (ctx) { },

        //Common to all
	CheckCollision: function(obj){...},
	CheckCollisionSimple:function(x,y){...},
	Collide: function(obj){...},
	BinMe: function(){...},
	GetTileX:function(){...},
	GetTileY:function(){...},
	CanSeeHero:function(){...},
	CanSeeUnit:function(unit){...},
	HeroCanSeeMe:function(){...},
	Stop:function(){...},
	IsMoving:function(){...},
	TurnToDirectionAtCorrectSpeed :function(direction,timeSinceLastLoop){...}
});

rp.Hero

Where would a game be without a hero. This object represents the hero. Its main difference from other objects is that it accepts user input.

rp.Hero = function () {
	//Call the base constructor giving this as the context
	rp.GameObject.apply(this, arguments);
	...
	rp.Decorators.Add(this,rp.Decorators.Collidee);
	rp.Decorators.Add(this,rp.Decorators.GoodGuy);
};
rp.Hero.prototype = rp.TypeHelper.Extend(new rp.GameObject(), {
	Draw: function (ctx) {...},
	Update: function (timeSinceLastLoop, levelTime) {...},
	Collide: function(obj){...}
});

rp.BadGuyBase

This is the base object for all bad guys. Much of the collision logic as the AI execution logic is handled in here.

rp.BadGuyBase = function(){
	rp.GameObject.apply(this, arguments);
	...
	this._name = "Bad Guy";
	...
	this._isExploding = false;
	this._command = null;
	this._actionStack = new rp.ActionStack();
	this._lifeBarWidth = 40;
	this._lifeBarTop = -30;
	this._lifeBarLeft = -30;
         ...
	rp.Decorators.Add(this,rp.Decorators.Collidee);
	rp.Decorators.Add(this,rp.Decorators.Collider);
	rp.Decorators.Add(this,rp.Decorators.BadGuy);
};
rp.BadGuyBase.prototype = rp.TypeHelper.Extend(new rp.GameObject(), {
	BaseDraw: function (ctx) {...},
	BaseUpdate: function (timeSinceLastLoop, levelTime) {...},
	Collide:function(obj){...},
	MoveToOuterPointOfCollision:function(iObj, xDiff, yDiff, timeSinceLastLoop){...},
	IsThisCollider:function(obj,xDiff,yDiff){...}
	DrawLife:function(ctx){...}
});

rp.StaticObjects

Some of the units leave carcasses when they die. Having that image rendered by the object that was destroyed would mean that it would have to be kept in memory and be updated in the game loop. In the interest of performance I have instead introduced an object that will always be in the game loop and would be responsible for rendering such images. It can also be used for rendering any other static images that are required.

rp.StaticObjects = function(){
	this._hasCreatedSprites = false;
	this._staticObjects = [];
};
rp.StaticObjects.prototype = rp.TypeHelper.Extend(new rp.GameObject(), {
	Update:function(){
	},
	Draw: function (ctx) {
		for(var i =0 ;i < this._staticObjects.length;i++){
			var obj = this._staticObjects[i];
			obj.Sprite.DrawImage(ctx, obj.X, obj.Y, obj.Rotation)
		}	
	},
	AddStaticObject:function(x,y,sprite, rotation){
		this._staticObjects.push({X:x, Y:y, Sprite:sprite, Rotation:rotation});
	}
});

rp.Decorators

JavaScript has no concept of interfaces or decorators. I do however need something like a decorator pattern to see if an object is a Collider, BadGuy, Projectile etc.. . So I have added a number field to the rp.BaseObject (base type of all objects) called ‘_decorators’. I will use the bit-wise operators (below) to add and subtract the various decorators to an object. This should be lightening quick and saves me having to add loads of fields to my object called things like ‘_isProjectile’. I have written a very simple module that does these operations and I use this throughout the objects in the game.

/*My very fast decorator pattern*/
rp.Decorators = {
	Projectile:1,
	Collidee:2,
	Collider:4,
	BadGuy:8,
	GoodGuy:16,
	CollisionAvoider:32,
	Tile:64,
	Is:function(obj,typeAsNum){
		return (obj._decorators & typeAsNum) === typeAsNum;
	},
	Add:function(obj,typeAsNum){
		obj._decorators = (obj._decorators | typeAsNum);
	},
	Remove:function(obj,typeAsNum){
		obj._decorators = obj._decorators ^ typeAsNum;
	}
}

You can think of Collidee as a kind of loose interface. If something is a Collidee then then it has a Collide method that will be called when it collides with something. The Collidee is responsible for what it should do inside the collide method. For Example, If zombie unit gets hit by a projectile then it should cause damage and eventually die. This logic is contained within the collide method.


rp.Tile

This object represents a single tile. Tiles are decorated with the Collider decorator if they are either not passable or are collideable.

  • _isPassable = Unit can walk through it
  • _isCollidable = Projectiles will collide with it

A pond would not be collidable and also not passable, A wall would be collidable and not passable… you get the idea.

rp.Tile = function(sprite, isPassable,collidable,x ,y , tileWidth, tileHeight){
	rp.GameObject.apply(this, arguments);
	...
	this._name = "tile";
	if(!this._isPassable || this._isCollidable){
		rp.Decorators.Add(this,rp.Decorators.Collider);
	}
	rp.Decorators.Add(this,rp.Decorators.Tile);
}
rp.Tile.prototype = rp.TypeHelper.Extend(new rp.GameObject(),{
	Draw: function (ctx) { 
		this._sprite.QuickDraw(ctx, this._X, this._Y, 0);
	}
});

Tiles are not handled exactly like other objects. There is no point in calling the Update method on a tile, because they have not update logic. Also, you would not want to iterate though all of the tiles in the game when drawing because most of them wont be in view.

The tiles are stored in a multi-dimensional array in the same way as they would be displayed in the map. This means that finding which tiles are currently in view is fairly simple. 1. Find out where the view port is in the real map 2.Translate that onto the multi-dimensional array (smaller map) and read out all of the tiles that would be in view (by looping though only those in view). This logic is handled in the GetVisibleTiles Method of the rp.MapManager.

Game Loop

The game loop should run as fast as it can, I will measure the time taken between loop iterations and move the game objects the according distance. For Example.. If the game loop was running slower then an object moving forward would move further on each iteration.

GameLoop: function () {
...
this.UpdateGameObjects(timeSinceLastLoop,thisLoopStartTime);
this.QueueNewFrame(rp.GameManager.DoLoop);
....
}

Each loop the UpdateGameObjects method of the gets called. It is responsible for iterating each of the objects that need to be updated and calling update on them. It will pass in the time since the last loop so that the object can move or update its self accordingly. It will also pass in the time since the start of the game so that objects can make decisions based on how far though the level (in time) the current time is.

QueueNewFrame will use the best method available to register the GameLoop method ready for the next iteration. Using the requestAnimationFrame is the best possible method available because you are basically asking to be included in the browsers rending loop. If this is not available in any form then window.setTimout() is used.

QueueNewFrame: function (renderingLoop) {
		if (window.requestAnimationFrame)
			window.requestAnimationFrame(renderingLoop);
		else if (window.msRequestAnimationFrame)
			window.msRequestAnimationFrame(renderingLoop);
		else if (window.webkitRequestAnimationFrame)
			window.webkitRequestAnimationFrame(renderingLoop);
		else if (window.mozRequestAnimationFrame)
			window.mozRequestAnimationFrame(renderingLoop);
		else if (window.oRequestAnimationFrame)
			window.oRequestAnimationFrame(renderingLoop);
		else {
			QueueNewFrame = function () {
			};
			intervalID = window.setTimeout(renderingLoop, 16.7);
		}

rp.ActionStack

The ActionStack is the container that each unit uses for managing the its actions. Each object has a list of actions that is to be executed in order. For example, A unit may have a move to destination action followed by a shoot action.

rp.ActionStack = function(){...};
rp.ActionStack.prototype = rp.TypeHelper.Extend(new rp.UnitAction(), {
	AddAction:function(action){...},
	HasActionOfType:function(action){...},
	HasActionByNum:function(n){..},
	GetActionByNum:function(n){...},
	Update:function(obj, timeSinceLastLoop, levelTime){...},
	Clean:function(gameTime){...},
	CancelAll:function(){...}
})

AI Command and Actions

I have created a fairly simple(ish) concept for controlling of units by the AI. It works will using 2 types.

Commands

A command can be though of as a command that a general might give to a a solder. “Soldier I want you to stay here and guard this position”. To the soldier that means 1. Dont move 2. Shoot at enemies that approach

Actions

An action is what a soldier might to to fulfill a command. For Example, Shoot at enemy, Move to Location.

From the descriptions above we can conclude that a command is more high level than an action. The AI for the game will just deal with the commands. The individual unit will deal with the actions.

A command that is running may add new actions to the action stack. But the unit may also add actions. For Example, If the unit takes a lot of damage it may decide to move to a safe location. This action may trump other actions or may cancel them completely. Once this action has been completed, the units current command may add actions to make the unit re-engage the enemy.

Path-finding

After some research I decided to use the A* algorithm. I wrote my own JavaScript implementation but it wasn’t really fast enough because the structure that I was storing the nodes didn’t lend it self the the task. I instead settled for using the http://github.com/bgrins/javascript-astar. It uses a binary heap as the storage for the nodes which is very fast when accessing the nodes the way that the A* algorithm does.

Collision detection

Collisions are detected on each frame. All of the colliders are checked against all of the Collidees. Every object marked as a collidee/collider must set is _collisionRadius and _collisionsCircle. After that the collision detection will be handed by the rp.LevelEngine. If an object is a weird shape (not a circle or square) then it will have still use the rp.LevelEngines collision detection, but will then run further detection inside its Collide method and return if thinks that no collision occurred.

The basic rp.GameObject collision detection is as follows:

CheckCollision: function(obj){
		if(this._shouldBeRemoved){
			return;
		}
		var xDiff = ((this._X<< 0) +this._collisionOffsetX) - ((obj._X<< 0) +obj._collisionOffsetX);
		var yDiff = ((this._Y<< 0) +this._collisionOffsetY) - ((obj._Y<< 0) +obj._collisionOffsetY);

		if(xDiff < 0){xDiff = xDiff*-1;}
		if(yDiff < 0){yDiff = yDiff*-1;}

		var overallCollisionRadius = this._collisionRadius + obj._collisionRadius;
		//square collision
		if(xDiff < overallCollisionRadius && yDiff < overallCollisionRadius){
				if(!this._collisionCircle){
					this.Collide(obj);
					return;
				}

				//circle collision
				if(Math.sqrt((xDiff*xDiff) + (yDiff*yDiff)) < overallCollisionRadius){
					this.Collide(obj);
				}

		}
	}

First it checks to see if the squares overlap, Then if the unit has a circle collisions radius, it checks to see if the circles overlap. If it detects that they overlap then there is a collision

Collidees

Objects that have Collide method. This will be called when something hits them

Colliders

Objects that are that are checked against the collidees to see if they overlap.Some object are both collides and collidees.

Sprites / animated and non-animated

There are two types of sprites

  • rp.Sprite

    This is responsible for rendering an image to the screen, it will rotate and position the image depending on the viewport rotation and the images location withing the map/viewport.

    When it is constructed a single image is specified

  • rp.AnimatedSprite

    When a rp.AnimatedSprite is constructed and array of objects is used and each object specifies an image and a display period. These are the frames of the animation and the rp.AnimatedSprite is responsible for showing the correct image on the correct frame.

    Some animations only need to play once (explosions for example) and others need to repeat this is implemented in this class also.

UGV Unmanned Groud Vehicle

Intro


I have embarked on a new project called the UGV.
It will basically be an old remote control car that has had the electronics taken out and some new electronics put in.
It will have async communication between the ground station (my laptop) and the UGV.
It will also have a video stream that will allow the user to see what the car sees.

Base Station

This is a screen shot of the program that will control the UGV.
The two boxes at the bottom are the serial data being transmitted and the serial data being received. The scroll bars on the right show the current motor speeds. The text box those (grayed out) is the current battery voltage of the UGV. The drop-downs at the top of the form will allow me to pick the correct serial port and video input and the large black area is where the video from the cars camera will show.
To help control the UGV, the software will interface with a saitek controller (£15)

This is a terrible controller that i wouldn’t use for gaming, but its will suffice for controlling the UGV. Interfacing with the controller was fairly easy using the DirectX -DirectInput SDK.

Parts

For communication between the ground station and the UGV I am going to use the Xbee wireless serial modems in transparent mode. I will pre-configure the modems so that they will only talk to each other.
For the on-board processing of commands and logic I am going to use a Boarduino that I have already put together.
For the basic chassis i am using an old 2 channel cheap remote control car (Hitari Tumber).
It doesn’t have steering but it has a motor that drives the left side and another for the right.
In the RC cars original configuration it only had four states:
1. Forward
2. Left
3. Forward and Left
4. Off
Once the UGV is complete it will be able to steer in both directions and reverse in both direction at varying speeds. Which will be a considerable improvement.
To be able to have this level of control I will have to use PWM (Pulse Width Modualtion) and a H-Bridge.
The H-Bridge (and transistor array) this I have opted to use is the Texus Instruments – L293NEE4
This will allow me to change the polarity of the motor’s and vary the speed using a single IC. There are 4 channels on this IC and I will be using all of them. Left-Forward, Left-Backward, Right-Forward and Right-Backward. It worth remembering that a motor cannot go forward and backward at the same time, so I will only actively use 2 channels at once. Each channel will handle up to 1 amp. So the total power that I can (safely) put through the 2 motors is 2 amp at 9v or 18watt. The datasheet for this IC does say that you can put a peak current of 2 amp so  that should give us enough head room for stalling the motors when it hits things. I will limit the current that can go through the IC by using a 4ohm resistor on the outputs of each pair of channels.
To help interface between the boarduino that runs its logic at 5v and the xbee that runs at 3.3v i used the Sparkfun LLC (logic level converter)
Its not that you couldn’t make your own conversion circuit with a potential divider and some transistors, but why bother when these are so cheap and use much less room.
So that I can get a video stream from the car i am using the cheap (£20) wireless camera
This can be bought from here
To take the video input from the receiver to the PC I am using a cheap video to USB interface. This came to £6.20 with P&P
The only issue is that there doesn’t seem to be any signed drivers for this device. Which is fine if you are running XP but if you are running Vista or 7 then you need to restart your machine in “Don’t worry about unsigned drivers” mode. Which is a real ball ache.

How its going to work

It will work like this:
1. The base station software will make a ASCII string that has the following format.
     [function],[parameters]
2. This will get turned to bytes, sent to the virtual serial port and then to the base station xbee. This will transmit it to the UGV xbee that will forward it on to the boarduino.
3. The boarduino will then turn it back to an ASCII string and extract the method name and the parameters. It will then run the method that has a matching name with the parameters.
 There are currently only two methods that can be called. The are name “1” and “2”, and they take one parameter that is a byte (a number between 0 and 254)
    Method “1” will control the left motor
    Method “2” will control the right motor
The motors can go forward and backward, this means that this data has to be contained within a single byte. So 0-126 will be reverse setting and 128 – 254 will be forward settings. 127 will be stationary. This means that each motor can have 126 power settings in each direction.
Sending a command of “1,150” would instruct the left motor to go forward at a setting of 22 (out of 126).
The boarduino natively supports PWM, so I will just use one of the PWM outputs on the boarduino for each motor/direction.

Reading the voltage

For the car to send back data, it works in exactly the same way (“[function],[parameters]”).
The boarduino has the ability to read a voltage between 0-5 v and tell you what the value is using a byte (number between 0 and 254). So getting the 9v battery voltage should be pretty easy. All I have to do is divide the 9 volts in half using a potential divider (2 resistors) then put that to a analog pin on the boarduino. Then do some simple maths (((value/254) * 5)*2), voila we have a voltage.

Laying out the board

Laying out the board is probably the hardest part.
I am using stripboard that is not in strips (from maplin)
I have never made PCB’s before and this is my first real try at making a permanent circuit, so stripboard should be fine. I tried the components in various layouts and tried planning it on paper. Eventually I got something that I thought would work.

Code Design

UGV base station application

I have written the UGV application in C#. I have tried to make the code fairly modular. The UGVController is the class that will actually control the car. You can subscribe to the events that it raises to get real-time feed of whats happening, but you could just use it as a black box.
The code for connecting to the car is as easy as:
UGVController car = new UGVController(“COM1″,”38400”);
car.Connect();
To tell the left motor to move would be as easy as:
    car.LeftMotors(150);
If I wanted to receive the voltage from the car I would subscribe to the car.OnVoltageRecived event.

Finishing

I have now mounted the board on the car. I used some PCB risers that are available from maplin. I have really thrown together the car in these later stages of the project, because I am running out of time due to other commitments.

Before I put the camera and tested the whole thing I took some time just to make sure that the car worked well. I did work quite well but it was obvious that the cheap alkaline batteries that I was using clearly were not up to the job. The car was struggling to get over small obstacles. I suspect this is due to the motors were drawing more current than the batteries could provide. I have ordered some NIMH (low internal resistance) batteries that will help power the car better.

Debugging SQL, capturing changes and fulfilling requirements with SQL Table Audit

Finding out how some data ended up as it did can sometimes be difficult. Without a proper audit trail of what data has changed and by who, it can be impossible to categorically say what happened and why.

Realizing these issues Renhold Software have created a great auditing tool called SQL Table Audit, it will actually keep a complete trail of data changes for a given table.

It works by creating triggers for your tables that will keep track of all data changes. It can even detect if a table if a table schema changed and will re-create table triggers. Once the triggers are created it will audit every data change that happens to that table.

Recording of malicious/unintended changes:

If a breaking change in some data has been made you need to find out why it happened. Unless you have invested some considerable time creating an auditing system you may not have any idea of who or what made the change. This is exactly the situation where I would recommend using SQL Table Audit. You would be able to track down who did it, what SQL statement they used to do it, when they did it and what was the value of the data before they did it.

Debugging a business process:

Often when debugging a business process you want to see what piece of SQL made a change to some data. This can easily be achieved because STA can record the SQL statement that made the change. Other information that may be used for debugging may be exact time, user, application, host name and the old and new value. All of the aforementioned are audited with every data change.

Fulfilling auditing requirements:

In a more and more security conscious world it is becoming expected that companies protect their data and know how it came to be. This is where SQL Table Audit comes into its own. You don’t need to be a developer or DBA to be able to use it and it gives you enterprise level auditing at the click of a button.

Having a backup strategy:

Should the worst happen and data in a table is accidentally ruined (an update without a predicate perhaps) then SQL Table Audit can create a SQL script that can rewind a subset of changes (in this case, those updates).

STA can also rewind those changes and put the result in a new table, file or create you a .sql script.

SQL Table Audit – Audit made easy

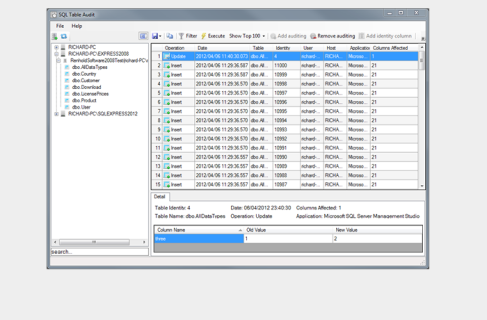
I have finally finished my new tool SQL Table Audit.

It is a complete automatic auditing system that uses triggers to audit data for a given table. It has a powerful interface that makes adding auditing to a table simple.

Image

It also has a great audit data viewer that helps you track down exactly what has been happening to your data.

I would really recommend that people download it and give it a try. Its completely free at the minute as it is in beta.

JavaScript calendar

I have added my JavaScript calendar control to this blog. Please feel free to use/edit/rewrite it.

This is what my JavaScript calendar control looks like. Please download it and give it a go.
  • Super fast date entry
  • Point and click simplicity
  • Operated with TAB and UP and DOWN keys
  • No learning curve
  • Full customizable
  • No use of any JavaScript library (so its lightning fast)

Making a simple audio synthesizer in C#

I have been into producing dance music for a while now and have always wondered how difficult it would be to make my own simple synthesizer. Turns out it not that difficult at all. I have created a very simple synthesizer in just one afternoon.

How does a software synth work?

Very similar to a hardware synth, it works by creating and mixing waveforms before effecting them to get a desired sound.

How do I create a waveform?

Well you need to write some code that will produce a wave. The most common wave to produce is a sine wave. This sounds like a constant tone with no harmonics.

This is what a sine wave looks like

Sine wave

Ok, so how do I make a sine wave in C#?

Its actually pretty easy to make a sine wave in C#. It a matter of using the mathematical function Math.Sin() then sending in the angle (in radians). Here is an example of my Sine occilator in my program:

public class SineOccilator : SignWaveTest.IOccilator {

	private double _radiansPerCircle = Math.PI * 2;
	private double _currentFrequency = 2000;
	private double _sampleRate = 44100;

	public SineOccilator(double sampleRate) {
		_sampleRate = sampleRate;
	}

	public void SetFrequency(double value){
		_currentFrequency = value;
	}

	public double GetNext(int sampleNumberInSecond) {
		double samplesPerOccilation = (_sampleRate / _currentFrequency);
		double depthIntoOccilations = (sampleNumberInSecond % samplesPerOccilation) / samplesPerOccilation;
		return Math.Sin( depthIntoOccilations * _radiansPerCircle);
	}
}

All of the hard work is done in the GetNext method. The calling code tells the GetNext what sample (of the current second) that it wants and GetNext will return a number between 1 and -1.

This works by working out the ‘samplesPerOccilation’ value, which is the basically “how many samples does one oscillation take at the defined frequency”

After working that out we can work out how far we would be through an oscillation by taking the remainder of the sampleNumberInSecond / samplesPerOccilation. Then making that a number between 0 – 1 by dividing that answer by samplesPerOccilation.

Now we just need to work out that the numeric value for the waveform at that point, this is as simple as using calling Math.Sin and passing in the (depthIntoOccilations * _radiansPerCircle).

So here is how you would call it:

List<double> data = new List<double>();

SquareOccilator o = new SquareOccilator(sampleRate);
SineOccilator j = new SineOccilator(sampleRate);
SawToothOccilator s = new SawToothOccilator(sampleRate);
RoyalSawToothOccilator rs = new RoyalSawToothOccilator(sampleRate);
SawToothOccilatorSteadyDetunable detunableOccilator = new SawToothOccilatorSteadyDetunable(sampleRate);
detunableOccilator.SetDetune(0.05);

s.SetFrequency(GetNoteFrequnecy.C);
for (int i = 0; i < sampleRate * 2; i++) {
	data.Add(s.GetNext(i));
}
rs.SetFrequency(GetNoteFrequnecy.C);
for (int i = 0; i < sampleRate * 2; i++) {
	data.Add(rs.GetNext(i));
}

Create a list of doubles to store the resulting wave sample values, Set the frequency to a “C” then add 2 Seconds worth ( 2 X 441000 samples) to the list.

How can I actually hear what it sounds like?

The easiest way to hear it is to export the wave you have produced to a .wav file. It is reasonbly simple to create a .wav file just follow the specification here.

I found an implementation in the Sixport Synth project that I changed slightly for my needs. It simply writes a “test.wav” file to the bin directory of the application.

public static void SaveIntoStream(double[] sampleData, long sampleCount, int samplesPerSecond) {
	// Export
	FileStream stream = File.Create("test.wav");
	System.IO.BinaryWriter writer = new System.IO.BinaryWriter(stream);
	int RIFF = 0x46464952;
	int WAVE = 0x45564157;
	int formatChunkSize = 16;
	int headerSize = 8;
	int format = 0x20746D66;
	short formatType = 1;
	short tracks = 2;
	short bitsPerSample = 16;
	short frameSize = (short)(tracks * ((bitsPerSample + 7) / 8));
	int bytesPerSecond = samplesPerSecond * frameSize;
	int waveSize = 4;
	int data = 0x61746164;
	int samples = (int)sampleCount;
	int dataChunkSize = samples * frameSize;
	int fileSize = waveSize + headerSize + formatChunkSize + headerSize + dataChunkSize;
	writer.Write(RIFF);
	writer.Write(fileSize);
	writer.Write(WAVE);
	writer.Write(format);
	writer.Write(formatChunkSize);
	writer.Write(formatType);
	writer.Write(tracks);
	writer.Write(samplesPerSecond);
	writer.Write(bytesPerSecond);
	writer.Write(frameSize);
	writer.Write(bitsPerSample);
	writer.Write(data);
	writer.Write(dataChunkSize);

	double sample_l;
	short sl;
	for (int i = 0; i < sampleCount; i++) {
		sample_l = sampleData[i] * 30000.0;
		if (sample_l < -32767.0f) { sample_l = -32767.0f; }
		if (sample_l > 32767.0f) { sample_l = 32767.0f; }
		sl = (short)sample_l;
		stream.WriteByte((byte)(sl & 0xff));
		stream.WriteByte((byte)(sl >> 8));
		stream.WriteByte((byte)(sl & 0xff));
		stream.WriteByte((byte)(sl >> 8));
	}
	stream.Close();
}

That’s pretty cool but I don’t think its going to win any awards

Well, yeah it is a really very simple synth but using that principle and mixing it with other waveforms it is possible to make some awesome sounds.

The source can be downloaded here

Memcached Clients – Which ones best

Firstly, what is Memcached and why would it be better than say using the inbuilt .net cache

If you are running a your .NET website from a single server there is very little point in even considering Memcached. Memcached is “Free & open source, high-performance, distributed memory object caching system” (http://memcached.org/). So if you are running your site from many web servers it may be preferable to have a shared cache. If you have performance draining database calls originating from your web servers you may want the first web server to make the database call to cache the result in the shared cache, so the other web servers don’t need to make the same database call.

How does it work

Memcached is a distributed memory object cache, so how does it actually distribute?
Effectively the Memcached server is simply a key value store so it is up to the client to pick the correct server to put the object on. The way it picks is to hash the key for the item you want to store and compute from that which server that item should be placed on. If you had two servers the split of items between the two should be approximately 50-50.

Choosing a client

There are two popular free clients to choose from BeIT and Enyim. I have quickly evaluated both and here are my findings:

BeIT

Setting up the client

Setting up the client in my app could not be easier. Firstly use that static Setup method on the MemcachedClient to set up the configuration for your Memcached client.

MemcachedClient.Setup("MyCache", new string[] { "127.0.0.1:11211" });

The first parameter is the Identifier for your Memcache client configuration and the string array is the the addresses of the memcached servers. In this example I am using the loopback address because I am running the server on my local box.

Once you have created this you can use the static GetInstance method on the MemcachedClient to retrive an MemcachedClient instance for this configuration.

MemcachedClient cache = MemcachedClient.GetInstance("MyCache");

Alternatively, and probably more useful, you can put the Client settings in a configuration section in the your application configuration file, you can then use then use the MemcachedClient.GetInstance() method to get an MemcachedClient instance for the configuration specified.

Using the client

Once you have set up the client you are free to change the settings and use the methods to interact with you Memcached server.

cache.Set("mystring", "helloMemcached", 4711);
            cache.SetCounter("users", 0);
            cache.Increment("users", 1);

Supported methods

  • Set – store this data
  • Add – store this data, but only if the server doesn’t already
    hold data for this key
  • Cas – Check And Store, store this data but
    only if no one else has updated since I last fetched it.
  • replace – store this data, but only if the server does
    already hold data for this key
  • append – add this data to an existing key after existing data
  • prepend – add this data to an existing key before existing data
  • Get(s) – The the value associated with a particular key. Gets will retrieve many
  • SetCounter – Set a counter that can then be incremented with Increment and Decrement methods
  • Increment – Will increment the value by the specified amount
  • Decrement – Will decrement the the value by the specified amount
  • Delete – Deletes an item
  • FlushAll – Deletes all items on all servers
  • Exists – Check to see if an item exists
  • Stats – Get key/value stats for each server
  • StatsByHost – Get key/value stats for each server

Enyim

Setting up the client

Setting up the client is pretty easy in Enyim also. You can put the settings in the application configuration file saving you having to set up the configuration in code.

Enyim.Caching.Configuration.MemcachedClientConfiguration config = new Enyim.Caching.Configuration.MemcachedClientConfiguration();
config.Servers.Add(new System.Net.IPEndPoint(IPAddress.Loopback,11211));
config.Protocol = Enyim.Caching.Memcached.MemcachedProtocol.Text; //you must set a protocol
Enyim.Caching.MemcachedClient client = new Enyim.Caching.MemcachedClient(config);

Using the client

client.Store(Enyim.Caching.Memcached.StoreMode.Add, "myItem", "myValue"); //The various ways of storing things use a single method and an enum rather than 3 methods
client.Store(Enyim.Caching.Memcached.StoreMode.Replace, "myItem", "myValue");
client.Store(Enyim.Caching.Memcached.StoreMode.Set, "myItem", "myValue");

Supported methods

  • Store – Stores the data specified under the specified key, takes an Enum that dictates if it is an Add/Replace/Set
  • Cas – Check And Store, store this data but
    only if no one else has updated since it was last fetched
  • Append – Add this data to an existing key after existing data
  • Prepend – Add this data to an existing key before existing data
  • Get – Gets the value associated with a particular key.
  • Get<T> – Generic version of Get
  • GetWithCas – Get the value associated with a particular key and will also return check and set value
  • GetWithCas<T> – Get the value associated with a particular key and will also return check and set value
  • TryGet – Tries to get an object from the cache, if it fails the output object is null
  • TryGetWithCas – Tries to get an object from the cache, if it fails the output object is null
  • PerformMultiGet – Gets many thing at once
  • Increment – Will increment the value by the specified amount, you can specify a default if the key doesn’t already exist
  • Decrement- Will decrement the the value by the specified amount, you can specify a default if the key doesn’t already exist
  • Remove- Deletes an item
  • FlushAll- Deletes all items on all servers
  • Exists – Check to see if an item exists
  • Stats – Get key/value stats for each server
  • StatsByHost – Get key/value stats for each server

Feature comparison

Enyim BeIT
Config file configuration yes yes
Persistent connections yes yes
Generic get and set methods yes no
Supports Binary protocol yes no
Supports SASL yes no
Supports all the standard Memcached operations in the protocol yes yes
Uses .NET serialization yes yes
Consistent hashing yes yes
Compression (built-in) no yes
Logging and tracing yes yes

Conclusion

Both work well. Enyim doesn’t have compression, but there is nothing stopping you using the .NET framework compression features. I think overall Enyim does have a richer feature set. Anecdotally I have heard that Enyim is faster, but that is likely to be due in part to it not compressing the objects before it sends them to the server. The support for the Binary protocol doesn’t mean that much to me, yes it will mean that less bytes need to be pushed down the pipe for the commands but I don’t think it will make a significant difference because most of the bytes (to be sent) are likely to be the bytes of the serialized object you wish to store. Both use the standard .NET Binary formatter so you can use the ISerializable interface on your types if you are worried about the shape of the type changing while old objects are still in the cache.

Related Links